

Sequelize-cli is a command line interface (CLI) that uses sequelize to automate the process of creating a development or production database with boilerplate codes. Interestingly Sequelize-cli offers some similar features to version control system like Git. Like you know already, git allows you to make changes to your codes, commit them and also rollback to your previous changes or commits, likewise Sequelize-cli. But rather than working with terms like commits and codes, Sequelize-cli focuses on creating database, models, running and rolling back migrations and the rest with just few lines of commands or generators.
Prerequisite
Node.js, Express.js, Sequelize, Git.
Objectives
In this tutorial, we would learn how to create a simple login app in nodejs and express.
We learn how to setup and configure postgreSQL.
- we would also learn how to use Sequelize-cli to speed up the process of creating databases, tables, models, columns in PostgreSQL for our login app.
- We would learn how to make changes to the database, tables and models using Sequelize-cli migrations.
- Lastly we would learn how to populate our database with data using Sequelize-cli seeders.
Dependencies
express: nodejs web server
nodemon: used to automatically restart the node server whenever changes are made to the code.
- sequelize: a promise-based Node.js ORM tool for Postgresql, MySQL, MariaDB, SQLite and Microsoft SQL Server.
- sequelize-cli: a command line interface for sequelize
- pg: a nodejs module for interfacing with postgresql database
pg-hstore: a node package for serializing and deserializing JSON data to hstore format
mysql2: a MySQL DBMS driver, which sequelize uses to access MYSQL database. Sequelize requires mysql2 to be installed for it to create a database.
Make sure you have Nodejs already downloaded and installed on your computer because we would be using the npm(node package manager) that comes along with it to install the above dependencies. if not, kindly visit here to do the needful.
Getting Started
Lets create a root folder for our app and lets name it loginapp. Open your visual studio code editor or any editor you are comfortable with and open the loginapp folder we created.
Next, create a JavaScript file called app.js which would be our root file to creating our express server and routes/endpoints. Open a terminal in vscode and lets create a package.json file to initialize our project.
$ npm init -y
Its time to install all dependencies for our app so lets do this by running the below command.
$ npm install express nodemon sequelize sequelize-cli pg pg-hstore mysql2
To be absolutely sure that the dependencies were installed open the package.json file , it should be listed there. lets move further by creating our express server since we have it installed already.
const express = require ('express')
const app = express()

const port = process.env.PORT || 8000

app.get('/', (req, res)=>{
    console.log('Welcome to my Login App!')
})

app.listen(port, ()=>{
    console.log(`Listening to my loginApp on port ${port}`)
})
Return to the terminal and lets launch the app with the below command:
$ nodemon app.js
We would definitely get two outputs on our console or terminal. The first saying
Listening to my loginApp on port 8000 and the second saying Welcome to my Login App!
So far we have created an express server and a simple app that outputs something on the console. Lets move further by creating a database with sequelize and sequelize-cli. Sequelize supports database such as mysql, sqlite, mariaDB, postgresql. But for this tutorial, we would be using postgresql.
Postgresql
Postgresql is an advanced enterprise and open-source relationship database system. it supports both SQL (relational) and JSON (non-relational) query. To download and install postgresql, click here.
During PostgreSQL installation, you would need to input a password for postgres superuser (administrator) permissions. This password will be used when you want to connect as the user “postgres” from psql or pgAdmin. (Make sure you write the password somewhere).
After the installation is completed, we would be connecting to the postgresql database server later on using either Sqlshell (psql) or pgAdmin (This two comes along with the postgresql installation).
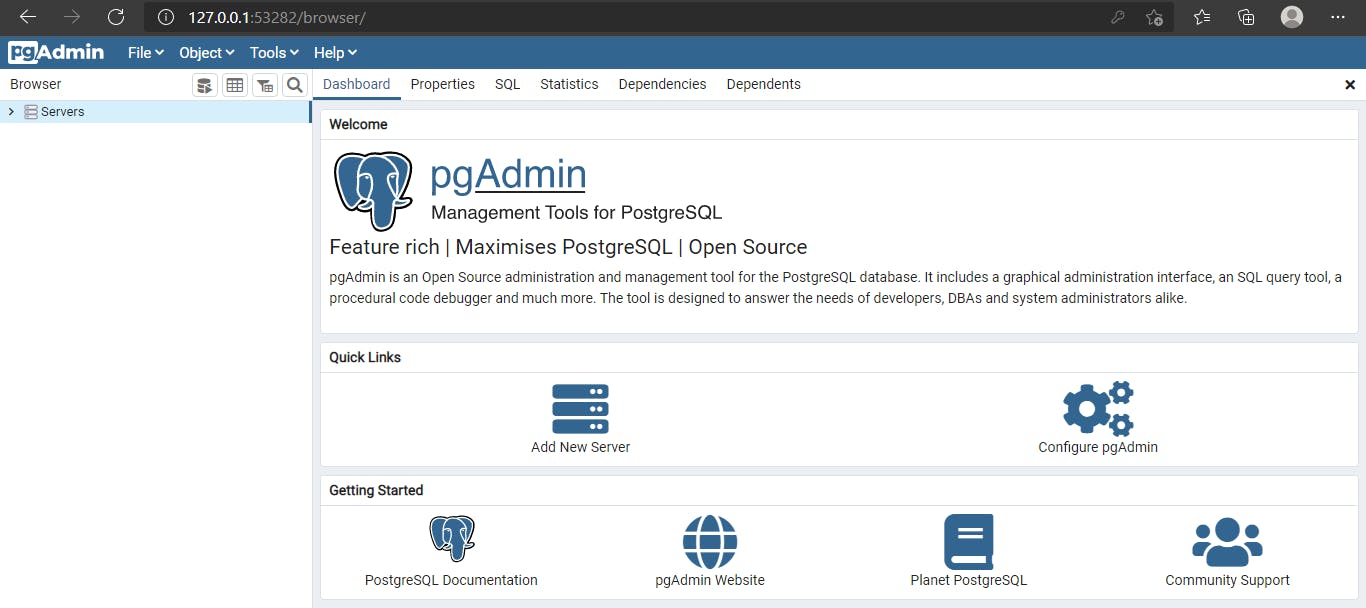
For the sake of this tutorial, we will be using pgAdmin . pgAdmin is a GUI management tool for postgresql database and its more fun to interact with than staring at the black and white console screen (psql) .
So far we have our server running, and PostgreSQL downloaded already. Its now time to bring in our lovely friend Sequelize-cli to spice up our project.
Introducing Sequelize-cli
Sequelize-cli has some boilerplates code and generators that makes it easier to create, make changes and manipulate our PostgreSQL database and tables etc.
Boilerplate code means a piece of code that are created just once and can be used over and over again.
So we be using sequelize-cli to create a database, models, and columns (username, password and email) for our loginapp.
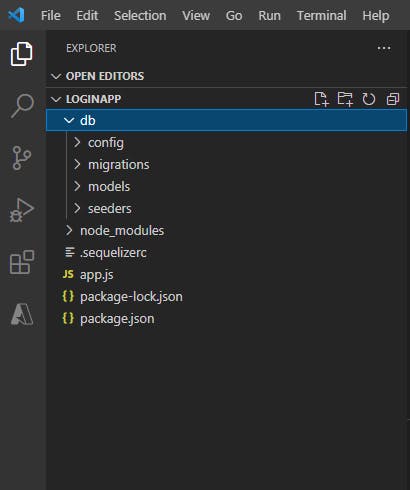
To begin, lets return back to our console terminal and terminate the server by pressing ctrl + c and enter yes. just like git, we need to initialize sequelize to launch our boilerplate codes. This would automatically create 4 folders inside our loginapp folder which are:
Config: defines the connections and configurations for our database.
Migrations: for creating tables and columns and making changes to them.
Models: for describing the structure( fields, attributes and relationships) of the database.
Seeders: for populating tables with data.
But listing the above folders in our loginapp folder would make our application directory look very unstructured and disorganized. So to avoid that let us bundle the folders and store them in another folder called db. To achieve this, create a file called .sequelizerc in our loginapp folder and insert the following code:
const path = require('path')
 module.exports = {
   "config": path.resolve('./db/config', 'config.json'),
   "models-path": path.resolve('./db/models'),
   "seeders-path": path.resolve('./db/seeders'),
   "migrations-path": path.resolve('./db/migrations')
 }
Then return back to the console and lets bootstrap those 4 folders into the db folder by running the sequelize-cli generator:
$ sequelize-cli init
In case the sequelize init generator pops out an error, then attach a node package runner called npx to the generator to run the sequelize command:
$
npx sequelize-cli init
To see a list of all sequelize-cli generators or commands, run:
$ npx sequelize generators
After the initialization, check the structure of the loginapp directory it should look similar to this:
Next lets us create a database called userDB for our loginapp. But before that, lets configure postgresql.
Configuring postgresql
To get started we need to tweak the configuration in the development section (since we are still developing the app) of our config.json file in the directory loginapp/db/config/ and note the following:
- username: the default username is postgres.
- password: remove the null and type the password you inputted or wrote down while installing postgresql earlier on. (i inserted mine).
- database: use any name of your choice but for our loginapp we are using userDB.
- host: use the default, 127.0.0.1 .
- dialet: change the mysql to postgres since we are using a postgresql database.
You can take a clue from my own tweakings below:
{
  "development": {
    "username": "postgres",
    "password": "xxxxxx",
    "database": "userDB",
    "host": "127.0.0.1",
    "dialect": "postgres"
  }
Creating a postgresql database
Lets now run the generator on the terminal:
$ npx sequelize-cli db:create userDB
This will create the userDB database in postgresql. if everything goes on well, you would see a message below:
Using environment "development"
Database userDB created.
Creating a connection to PostgreSql Server with PgAdmin
lets open our pgAdmin server to see if our database was actually created.
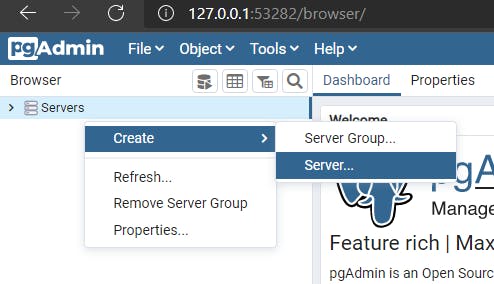
To launch our pgAdmin server, search for it on your computer and open it. you would be redirected to your default web browser.
To create a connection, right-click on the servers and create a new server:
You might be prompted to enter your postgresql master password before creating a server.
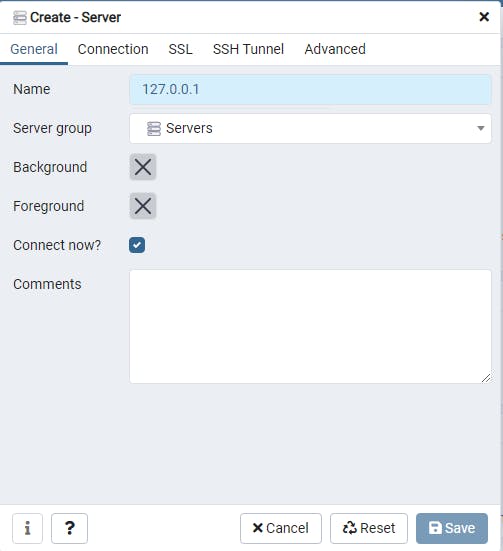
Then on the General tab, input the host address 127.0.0.1 as the server name:
Now navigate to the Connection tab and type 127.0.0.1 again on the host name/address field and type in your postgresql password in the password field. The rest should remain the same. save it and voila!! A connection would be established between postgresql server and our loginapp:
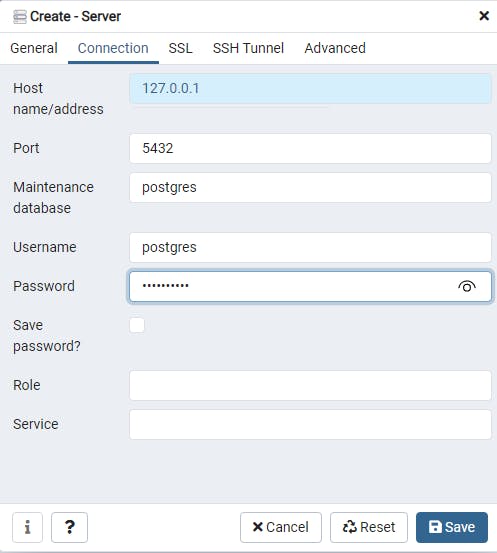
For postgresql database, the default connection port is 5432.
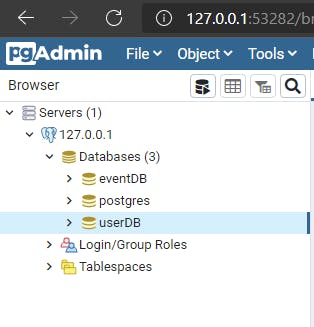
Once a connection is established , we can be able to see our userDB database at the left-side pane:
Its now time to create models and migrations for our login app.
Creating models with sequelize-cli
Models are the essence of Sequelize. A model is an abstraction that represents a table in your database. The model tells Sequelize several things about the entity it represents, such as the name of the table in the database and which columns it has (and their data types). A model in Sequelize has a name. This name does not have to be the same name of the table it represents in the database. Usually, models have singular names (such as User) while tables have pluralized names (such as Users), although this is fully configurable. For our loginapp we would be creating a User model with username, email and password (fields). To achieve this, lets run the command:
$ npx sequelize-cli model:create --name User --attributes username:string,email:string
Lets pretend as if we forgot to add the password field to the model. The reason we are doing so is because we will be using migrations to add it later on.
After creating the User model, two files would be added to the folder. A user.js file in the models folder and another file 20210520160321-create-user.js in the migrations folder. The 14 digits (20210520160321) is a timestamp that signify the time and date of the moment it was created.
Note: whenever you create a model with sequelize-cli, sequelize automatically creates a migration file of that model in the migrations folder. The files in the models folder describes the structure of each tables in the database while the files in the migrations folder coverts the models to tables in our database. so definitely a User model would create a Users table in the userDB database through migration.
But before the Users table can reflect in the userDB database in pgAdmin, we need to make sure that the migration file XXXXXXXXXXXXXX-create-user.js in the migrations folder is executed.
All or pending migrations must be executed before they can be visible in the database.
run the command to execute the migration:
$ npx sequelize-cli db:migrate
Lets return back to pgAdmin to view our Users table and its columns. Refresh the server - click on database - then UserDB - click on tables - the Users table should be listed on the dropdown - click on columns, the username and email are listed there together with two new columns (createdAt and updatedAt). surprised? Dont be!
Whenever you create a model in postgresql, it attaches two columns by default to the table which are:
createdAtthat indicates the date & time a record is added to the table andupdatedAtwhich indicates the date & time a record is updated in the table.
So it seems everything is falling in place gradually but remember, we omitted something earlier on. we forgot to add the password field when creating the User model. so lets add it now by setting up migrations.
Setting up migrations with Sequelize-cli
Sequelize migrations allows you to make changes to your database and to track those changes. migrations can be used for: creating a table for new model, dropping a table, changing data already in the database (called a "data migration") and adding, updating, or deleting columns of an existing table. visit here for more info on migrations.
For our loginapp, we want to use migrations to add a column (password) to our existing table (Users).
To do this, run the sequelize-cli command:
$ npx sequelize-cli migration:generate --name add-password-to-user
This would create a migration file with a timestamp XXXXXXXXXXXXXX-add-password-to-user.js in the migrations folder. it should like this:
'use strict';

module.exports = {
  up: async (queryInterface, Sequelize) => {
    /**
     * Add altering commands here.
     *
     * Example:
     * await queryInterface.createTable('users', { id: Sequelize.INTEGER });
     */
  },

  down: async (queryInterface, Sequelize) => {
    /**
     * Add reverting commands here.
     *
     * Example:
     * await queryInterface.dropTable('users');
     */
  }
};
Breaking down the code:
queryInterface is a method in migrations used for making changes to tables and columns. migrations should be reversible if possible. This means they can run forwards to make a change, and roll backwards to reverse that change. The up and down functions in a migration are made to run this way just like the above migration file.
We still need to adjust the code to finalize the process of adding the password to Users table. To achieve this, remove the comments and let's add the following addColumn() and removeColumn() methods into it:
'use strict';

module.exports = {
  up: async (queryInterface, Sequelize) => {

     await queryInterface.addColumn('Users', 'password',{ type: Sequelize.STRING });

  },

  down: async (queryInterface, Sequelize) => {

     await queryInterface.removeColumn('Users', 'password',{ type: Sequelize.STRING });

  }
};
Remember to run the command:
$ npx sequelize-cli db:migrateafter a new migration file is created and for it appear on the database.
Also go to the user.js file in the models folder and update the User model structure by adding password: DataTypes.STRING
'use strict';
const {
  Model
} = require('sequelize');
module.exports = (sequelize, DataTypes) => {
  class User extends Model {
    /**
     * Helper method for defining associations.
     * This method is not a part of Sequelize lifecycle.
     * The `models/index` file will call this method automatically.
     */
    static associate(models) {
      // define association here
    }
  };
  User.init({
    username: DataTypes.STRING,
    email: DataTypes.STRING,
    password: DataTypes.STRING
  }, {
    sequelize,
    modelName: 'User',
  });
  return User;
};
Now that our table is set and all columns are added, its time to populate the Users table with data using seeders.
Setting up Sequelize-cli seeders
Sequelize-cli seeders provides a way to populate tables with data during development and testing before the app is deployed for production. All generated or inputted data or records are stored inside the seeders folder in loginapp/db/seeders.
The seeders folder is among the 4 folder that is created when we initialize our project with sequelize-cli.
To generate a seed for our Users table, run:
$ npx sequelize-cli seed:generate --name Users
A seed file with a timestamp XXXXXXXXXXXXXX-Users.js would be created in the seeders folder. open the file and replace it with this.
'use strict';

module.exports = {
  up: async (queryInterface, Sequelize) => {

      await queryInterface.bulkInsert('Users', [{
       username: 'John Doe',
       email: 'johndoe@yahoo.com',
       password: 'johndoe123',
       createdAt: new Date(),
       updatedAt: new Date()

      }], {});

  },

  down: async (queryInterface, Sequelize) => {

      await queryInterface.bulkDelete('Users', null, {});

  }
};
To execute the seed and for it to be visible in the Users table in pgAdmin run:
$ npx sequelize-cli db:seed:all
Then Go to the Users table in pdAdmin, refresh it - right click on it - select view/edit data - select All rows. There you have it! you just successfully inserted a random data in the Users table. less code, less stress!
But what if you want to insert more records into your table, lets say 200 records. of course it would be a pain in the neck if you intend to do that manually. Interestingly, JavaScript has a package called faker.js that can generate massive amounts of fake data for our database in nodejs. Isn't that cool? Lets give it a try!
For more documentations on faker.js, visit here
Return back to the terminal and lets install faker.js package.
$ npm install faker
Then edit the seed file with this:
'use strict';
const faker = require('faker')
const users = [Array(200)].map((user)=>(
  {
    username: faker.internet.userName(),
    email: faker.internet.email(),
    password: faker.internet.password(10),
    createdAt: new Date(),
    updatedAt: new Date()
  }
))

module.exports = {
  up: async (queryInterface, Sequelize) => {

      await queryInterface.bulkInsert('Users', users, {});

  },
  down: async (queryInterface, Sequelize) => {

      await queryInterface.bulkDelete('Users', null, {});

  }
};
Breaking down the code: we required the faker package into the seed file, we created an array of length 200 (this means the total number of records cannot be more than 200) and we use the map function to iterate a single element or record of the array. Then we use faker to populate the columns in our table and lastly we use the bulkInsert function to insert the record into our Users table.
run the command to execute the seed again on the table:
$ npx sequelize-cli db:seed:all
Now Lets create a route and api to output all records from the Users table in login app. lets head back to the our root file app.js and fill it with this:
const express = require ('express')
const models = require('./db/models')
const app = express()


app.use(express.json())

const port = process.env.PORT || 8000

//Fetch all users
app.get('/users', async (req, res)=>{
    try {
        let users = await models.User.findAll()
        res.send(users).status(200)
      } catch (err) {
            res.status(400).send(err)
      }
})

// Fetch a single user
app.get('/users/:id', async (req, res)=>{
    try {
        const user= await models.User.findById(req.params.id)
        res.send(user).status(200)
      } catch (err) {
            res.status(400).send(err)
      }
})

app.listen(port, ()=>{
    console.log(`Listening to my loginApp on port ${port}`)
})
Breaking down the code: To output records from our table we need to access our User model by requiring the models folder. Then we created a route with the http get method to send a request via the resource /users which in turn returns a JSON response of all users record from our database and status code 200 which means everything went well. If an error occurs, the catch block would send back a 400 status code signifying a bad request. Same applies to fetching a single record via the resource /users/:id .
Start the server with nodemon app.js and Open postman to test the api using the server endpoint localhost:8000/users. All records in the table will be displayed. Also localhost:8000/users/1 to display the first record from the table.
If you wish to make a git commit or push your code to GitHub remember to create
.gitignorefile to hide the node_modules folder.
Conclusion
So far sequelize-cli has really simplifed our coding experience and the amount of time used in creating database, models and tables for our login app. Nevertheless, creating models and tables with just sequelize alone should not be underated especially for someone who's just getting started. It's all about preference or what works best for you. But with sequelize-cli, It's definitely a fast approach to getting things done while you nod to your favorite song. It's the icing on the cake!